Building an autonomous racecar
01 May 2018Today I’ll talk about how I built a fully autonomous racecar with my teammates. Over a 5 month period, I learned and implemented the principles of perception, planning and control into the racecar under the guidance of Professor Behl. My team’s goal was to have our autonomous vehicle smoothly and quickly navigate a race course while minimizing collisions.
Skills Used:
- Robot Operating System (ROS)
- Python scripting
- System Design
- Project Management
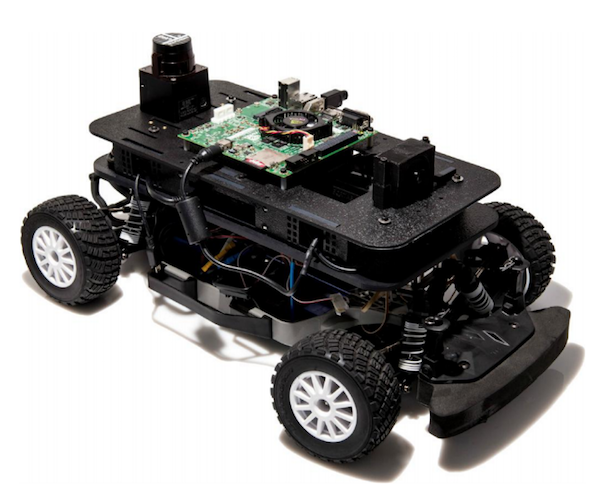
 Figure 1: The 1/10 scale racecar we built. See if you can spot the LIDAR, GPU and microcontrollers on the chassis.
Part 1: Setup & Implementing Control
The first step was assembling the car. We took a standard RC Car and upgraded its sensing, processing, and communication capabilites. The most important parts we added were the Hokuyo 2D LiDAR sensor (for sensing), the Teensy microcontroller (for PWM interfacing between GPU and controls), and the NVIDIA Jetson TK1 GPU (for onboard processing).
After assembly we designed the system for controlling the car. We removed all the RC components and rewired the circuitry so that the controls were directed from our ROS network instead of by the radio. Figure 2 is a brief diagram of how the entire system works (note: the final product substitutes the keyboard with the Perception algorithms we implemented).
 Figure 2: System Diagram for converting keyboard commands from the computer to PWM signals which control the F1/10 car.
Part 2: Implementing Perception
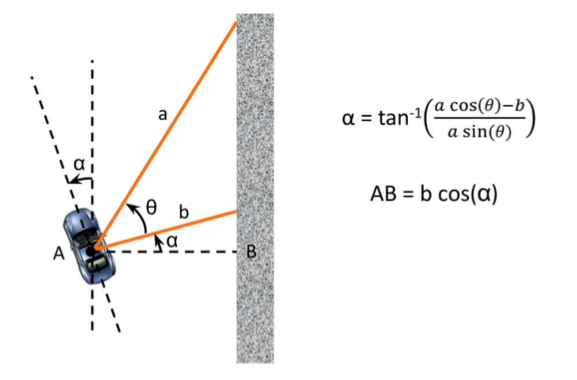
We implemented a wall-following algorithm, velocity controller, and collision avoidance system in our autonomous racecar. The wall following algorithm essentially uses the LIDAR information and basic trigonometry to ascertain the trajectory and the lcoation of the car (see Figure 3). Then, using a simple control algorithm for feedback,, we can adjust the car’s speed and trajectory. If you’re interested, I go more into detail of the math for the controller in a series of blog posts here.
 Figure 3: Measurements needed to perform wall-following algorithm. The LIDAR scans take measurements of the wall to measure the length of a and b. Taken from Professor Behl’s Autonomous Vehicle class (CS4501) at the University of Virginia.
Finally, after several months of design, programming and implementation, we arrived at our final product. We raced our vehicle within a cardboard racetrack and here are our results! See if you can spot how the wall-following algorithm, velocity controller and collision avoidance algorithms work in the background!!
Part 3: Future work
Although this vehicle performs well in this sandbox, there are endless possibilities for improvement, which is what I love about the field for autonomous vehicles. I included a shortlist of some cool ideas I’ve been exploring:
- Implementing SLAM algorithms: SLAM stands for simultaneous localization and mapping. This would enable the car to learn the environment online and improve on each pass through.
- Computer Vision: Simply adding a camera could dramatically improve the perception. The robot would be able to see turns or obstacles and plan accordingly. This could be implemented with CNN’s, which are super cool.
- Reinforcement Learning: This is my favorite ML algorithm. Suppose we were racing against adversaries. Reinforcement learning could be used to train how the robot reacts to the adversarie’s movements.
Finally, I’d like to thank Professor Behl for teaching this special topics course. I learned a ton about autonomous vehicles and the problems they face today.
